uzERP contains other modules which were specifically developed to meet the needs of the project’s original sponsor Severn Delta Limited. While these may prove useful, and are delivered with the other modules, they are not documented.
[Quality|Quality)
[Customer Service|Customer Service)
[HR|HR)
[Ticketing|Ticketing)
[Calendar|Calendar) (Deprecated)
[Engineering|Engineering)
[User Space Tables) (Deprectated)
[EDI)
1 - Accounts
Within the Finance function there are many separate modules. Although Accounts appears in the top menu and behaves like a normal module it is in fact a ‘group container’ for all of the Finance related modules.
1.1 - Cash Book
The Cash Book module provides a record of the cash received and paid out within each bank account.
The Cash Book module provides a record of the cash received and paid out within each bank account. It is fully multi-currency and closely linked to the other accounting ledgers.
Generally, most of the transactions for the Cash Book will be input automatically from the Sales and Purchase ledger modules in the form of receipts and payments. However, there are always entries that need to be posted directly, for instance:
Tax transfers to the regulatory authorities
Wages and Salaries payments
Direct payments for settlement of expense claims or credit card purchases
The above payments types, and more, can be entered directly into the Cash Book and allocated to General Ledger income, expense, asset or liability accounts. In addition, the VAT on these transactions can be accounted for where applicable.
Although normally used for Bank accounts separate accounts can be set up for petty cash, merchant services (such as Worldpay, Paypal, Visa or Mastercard) and business debit cards.
Features of this module include
Unlimited Bank accounts each allocated a unique General Ledger account code and cost centre combination
Entry of payments or receipts in any defined currency
Payments can be linked to contacts including those not defined in Purchase or Sales Ledgers
Account for VAT directly on payments or receipts
Transfers of funds between bank accounts in the currency of the paying OR receiving account
Easy check box style reconciliation to statement
Entering a payment
Bank reconciliation
Periodic Payments/Receipts
Periodic payments are used for direct debits or standing orders (payment OR receipt). They can be set up for Purchase Ledger payments or Sales Ledger receipts as well as direct Cashbook payments. Information on how to set them up is here
Once set up Period Payments will appear in the overdue periodic payments uzLET within cashbook to remind you to post them.
1.2 - General Ledger
For detail on how to set up the general ledger refer to the Ledger Set Up section
1.3 - Payment Terms
Payments terms are used in the sales and purchasing systems to determine when transactions are due for payment and whether discount should be applied.
Description - for example 30 Days from Date of Invoice
Basis - the basis of calculation of the due date either by reference to the Invoice date or Month end date
Days - the number of days from the base day
Months - the month end used in the base day
Discount - a percentage which is used in Sales Ledger to calculate the settlement discount applicable to the transaction
Each Customer or Supplier is allocated a payment term from this table. Examples
Description
Basis
Days
Months
Discount
45 Days from Invoice Date
Invoice
45
0
0
End of Month following Invoice Date
Month
0
1
0
End of Invoice Month plus 75 days with 2.5% Discount
Month
75
0
2.50
End of Month 2 following Invoice Date
Month
0
2
0
1.4 - Purchase Ledger
The Purchase Ledger is used to record details of financial transactions between your company and your suppliers. With it you can record supplier invoices and control their payment.
A typical workflow for Purchase Ledger is as follows:
Add a supplier record for contacts already in the system
Create invoices from Goods Received Notes or enter invoices and credit notes directly using the Purchase Invoicing module and post to the ledger;
Post credit and debit journals to the Purchase Ledger for contras and the like;
List un-posted invoices periodically to clear any queries;
Select invoices which are authorised and due for payment into payment batches with optional filters including paying bank account, payment method, supplier classifications - uzERP can process a number of payment batches in parallel, e.g. for different payment methods;
Produce a list of items selected for payment;
Review the selection on screen and optionally remove some transactions from the paymePurchase Ledger nt run;
Pay the transactions selected and produce payment documents (cheques, remittance advices etc) where required or generate payment files for BACS;
Make ad hoc or manual payments (e.g. a hand written cheque) by supplier and match with invoices settled;
Pay an amount to a supplier which is not yet allocated to an invoice;
Allocate cash and credits to invoices and other debit transactions.
In common with all modules Purchase Ledger uses progressive disclosure to display information about suppliers and transactions. There are also several dashboard uzLETS to provide quick access to useful information.
Suppliers
Supplier records need to be added based on already existing Accounts from the Contacts module
Supplier * - the suppliers’s name is selected from the accounts which have not already been allocated as a purchase ledger supplier;
Payee Name * -
Remittance Advice - a boolean (Yes/No) to determine if a remittance is produced for this supplier;
Currency * - the currency of the account;
Bank Account - the bank account the supplier is normally paid from;
Credit Limit * - a credit limit which can be used for supplier planning purposes;
Payment Term * - the payment terms agreed with this supplier which will be used to calculate due dates on invoices;
Payment Type * - how this supplier is normally paid;
Tax Status * - determines if tax (VAT) is charged and if the supplier is included in EU Intrastat reports;
Receive Into - where goods are normally received from this supplier;
Order Method -
Email Order -
Email Remittance -
Sort Code/Account Number/Bank Name Address/IBAN Number/BIC Code - banking information.
Items marked * are mandatory.
Journals
Payments and Allocation
Manual payments are handled
[[Batch payments]] on the other hand have a defined procedure.
Ledger Transaction Status Codes Reference
Some reports may show raw status codes against each transaction. Each code has the following meaning:
N = New
O = Open
Q = Query
R = Part Paid
P = Paid
1.5 - Purchase Ledger Batch Payment
Needs review:
Remove site specific links
Include information on injector classes for BACS and Dummy
Make sure that the default printer is set to the cheque printer before you start this procedure.
To select batch payments go to the purchase ledger suppliers list and use the Select For Payment action on the sidedbar.
to select items by payment type and customer - tick boxes required and check total before saving.
Then use the Selected Payments action which will show the selected payments (no of items etc) clicking the currency link will take you to a list which can be printed and checked - at this point you can still back out.
Enter all details for the payment run, i.e. the bank account, batch reference etc. At this point if you click PAY the purchase ledger is updated and the invoices are allocated per the payment run. If you click PAY you cannot back out.
Once they are printed, on the next screen, enter the cheque numbers (start and finish) and the PL and cashbook will be updated to reflect the cheque numbers.
You will then be taken to the print remittance screen where you can print or send the remittance advices.
Available integration to HSBC BACS standard 18 file format.
By setting up an email address tagged ‘REMITTANCE’ under the system company this will act as the return address for the remittance.
1.6 - Sales Ledger
The uzERP Sales Ledger allows you to create and maintain information about your customers. Invoices are entered in the [Sales Invoice Register](Sales Invoice Register) system when you sell goods and services and cash receipts and other credit transactions can be allocated against the invoices.
The Sales Ledger is an open item system which means that the invoices remain outstanding until they are removed by having credit items (cash, Credit Notes) allocated to them. Postings are made to the General Ledger and the Tax system automatically.
The customer is the basic unit within the Sales Ledger to which all other pieces of data are related. All transactions are entered against a customer.
Basic Information:
Name * - the customer’s name is selected from the accounts which have not already been allocated as a sales ledger customer;
Statement - a boolean (Yes/No) to determine if a statement is produced for this customer;
Currency - the currency of the account;
Bank Account - the bank account the customer normally pays into;
Credit Limit * - a credit limit which can be used for credit control purposes;
Payment Term * - the payment terms agreed with this customer which will be used to calculate due dates on invoices;
Payment Type * - how this customer will normally pay;
So Price Type - the price type, if allocated, dictates the price used during Sales Order Processing;
Tax Status * - determines if tax (VAT) should be charged to this customer and if the customer is included in EU Intrastat reports
Despatch From - which warehouse this customer’s goods are normally sent from
Sl Analysis -
Invoice Method -
Email Invoice -
Email Statement -
EDI information -
Items marked * are mandatory.
Journals
Receipts and Allocation
Customer Discounts
The customer discount matrix allows individual discount percentages to be allocated by product group. These discounts are then applied during Sales Order Processing.
Credit Control
1.7 - VAT Module
VAT Returns
Menu: Accounts > Tax > VAT & Intrastat
This will display a list of VAT returns and their status. To view a VAT return and have more options, click the year on the far-left that corresponds to a particular return.
VAT Return View
This view shows the VAT values, submission receipt details and provides actions and reports for a return.
Actions
Update VAT Position, Recalculates the values of the VAT return using the current state of accounting records.
Close VAT Period, Recalculates the values of the VAT return and marks the VAT period as closed. No further changes can be made.
Submit VAT Return, Submit the VAT return to HMRC using Making Tax Digital.
Print VAT Return, Print, view or email a paper copy of the VAT return.
View Transactions, View transactions relating to VAT Inputs, Outputs, EU Sales and EU Purchases. These reports can also be printed and output to email or CSV file.
Making Tax Digital
VAT-registered businesses with a taxable turnover above the VAT threshold are required to use the Making Tax Digital (MTD) service to keep records digitally and use software to submit their VAT returns from 1 April 2019. The VAT module enables you to submit VAT returns directly from uzERP to HMRC.
uzERP is an HMRC recognised solution for Making Tax Digital for VAT. We configure the systems of customers who have support agreements to use Making Tax Digital for VAT to submit VAT returns.
Configuring MTD
The configuration file for MTD is conf/oauth.yml. Other Oauth2 integrations may also be configured in the same file.
The clientid, clientsecret are provided to developers by HMRC. Supported uzERP customers are provided these values, along with the clientuuid by uzERP LLP, see https://www.uzerp.com/mtd-terms.
Notice
If conf/oauth.yml does not exist the VAT module will still work as expected, but you will not be able to submit returns to HMRC and a warning will be shown.
clientuuid is an RFC4122 version5 uuid, using a SHA1 hash and the X500 namespace, that encodes the user company name. For example, on a Linux operating system the following command would generate a unique client uuid:
Once your uzERP system is configured for MTD you need to authorise it to read your company’s VAT records and post returns.
In the menu, go to: Accounts > Tax > VAT & Intrastat
Your browser will redirect to a page on the HMRC website where you will need to log-in with your credentials and authorise uzERP for MTD. Following authorisation, you will be returned to the list of VAT returns in uzERP.
By law uzERP must send additional information called Fraud Prevention Headers when submitting VAT returns to HMRC. The headers may contain personal information and the HMRC have published a Data Protection Impact Assessment.
Fraud Prevention Headers sent by uzERP:
Header Name
Content
Gov-Client-Connection-Method
OTHER_DIRECT
Gov-Client-Device-ID
clientuuid (see above)
Gov-Client-User-IDs
uzERP user name of the logged-in user
Gov-Client-Timezone
Current timezone offset from UTC, e.g. UTC+01:00
Gov-Client-User-Agent
Operating system information, e.g. Linux 5.1.6-300.fc30.x86_64 #1 SMP Fri May 31 17:43:23 UTC 2019 x86_64
Gov-Vendor-Version
uzERP version number
2 - Report Writer
The uzERP report writer uses views or tables created in the Reports schema of the database in use. These tables or views can then be used to build end user reports without any particular knowledge of the underlying databse structure or SQL.
Views
By default, views in the public schema are not surfaced in the uzERP Report Writer. If you want to use a standard view in the reporting module then set up a new view under the reports schema - the example below takes the standard GL transactions view and makes it available for reporting
You can of course omit columns or add WHERE clauses to pare the data down.
Using this technique you can create custom views from any data in the system - as long as the view is in the reports schema then it will be available for reporting. It also means that one underlying view or table can be used to drive many end user reports.
Building a basic report
To add a basic report go to Reporting -> Reports -> Add Report.
There are three panes:
Report Options - this allows for the selection of the base view/table and report name. It shows a list of columns available based on the view/table selected from the drop down.
Report Builder - columns are dragged here to build up the report. The order of the columns here determine the order of the output within the report.
Properties - when a selected column is double clicked the properties for that column are shown and can be changed
3 - Contacts
Contacts
The Contacts module is where information about your business partners is stored
[[Accounts]] - used to keep track of Customers and Suppliers details
[[People]] - employees of your Business Partners
[[Leads]] - sales prospects
Contacts have an owner and be assigned to another system user for management. The screenshot shows the basic details held against any Account contact.
Optional and customisable CRM details covering Status, Source, Classification, Rating, Industry and Type can be allocated. In addition the following information is stored against any contact in the system. It is either entered directly or ‘related’ information from other parts of the system.
Opportunities/Activities
These related items link back to the Opportunities and Activities entered against the Account/Person/Lead via the [[CRM]] module.
Projects
The Projects module allows projects to be assigned to contacts at the company and/or person level - this is usually the main client contact.
Notes
Notes can be attached to all contacts and analysed by note ’type’ If one of the Sales Order/Invoice Purchase Order/Invoice note types are used the note will ‘pop up’ when entering an order/invoice against the Company or Person.
Attachments
Files such as drawings, contracts etc can be uploaded to the uzERP file server and attached to a contact here.
Addresses/Phone/Fax/Email
Each contact can have multiple mail and email addresses and phone/fax numbers. Those addresses marked shipping, billing and payment can be used as options in the despatch, sales ledger and purchase ledger systems respectively
Meetings/Calls
Details of meetings and calls can be added here. Meetings will ling back to the calendar module if required.
3.1 - Accounts
The Accounts section under [[Contacts]] stores information on business partners that you already deal with.
In order to tag an account for use in the [[Sales Ledger]] or Purchase Ledger the category must be set to Customer or Supplier. An account can be either or both meaning that a single source of contact information is kept for all trading partners.
3.2 - Leads
The Leads section of the [[Contacts|User Manual/Modules/Contacts]] module stores information about sales prospects for use in the [[CRM]] process.
When a lead turns from being a prospective customer into a live account it can be converted using the convert to account option - it will then be available in the [[Accounts]] section of the [[Contacts]] module and can be allocated as a customer in the [[Sales Ledger]].
3.3 - People
People may be entered independently or associated with [[Accounts]] or [[Leads]]
4 - Logistics
Logistics
The Logistics group in the main menu contains all of uzERP’s logistics related activities: Sales, Purchasing, Despatch, etc.
4.1 - Delivery and Despatch Schedule
A Calendar view of all of the activity in the warehouse.
4.2 - Despatch
Manages the despatching function and warehouse operations.
A view of all the Sales orders that are ready to go.
4.5 - Purchase Invoice Register
Purchase Ledger Invoices are entered from within the Logisitics area. Going to Logisitics > Purchase Invoicing > Purchase Invoices shows a list of Supplier invoices and their current status along with processing actions in the sidebar.
Creating Invoices
Action: New Invoice
The New Invoice action creates a new invoice against a supplier. A GRN number can optionally be entered against each line, but products and quantities cannot be entered or selected. This method of creating invoices can be used when you don’t need a purchase order or GRN, but need to register an invoice for payment.
Do not use the New Invoice action for invoices against blanket/call-off or orders for stock items. When this type of invoice is matched, the purchase order line will be considered complete and marked as invoiced, no more deliveries will be able to be received against it. Always use Create Invoice from GRN for blanket/call-off or orders for stock items.
Action: Create Invoice from GRN
[[Received|Modules/Logistics/Purchasing/Receiving]] purchase order lines will have a GRN (Goods Received Note), which can be used to create a supplier invoice. The Create Invoice from GRN action shows a list of GRN lines that can be selected to create an invoice that mirrors an invoice received from a supplier.
Matching Goods Received to Invoices
When an invoice is received against an order it can be matched against a Goods Received Note (GRN) by going to Purchase Orders > Create Invoice From GRN.
If an invoice is entered then subsequently needs to be matched go to Logistics > Purchase Orders > Purchase Orders > Match GRN to Invoice - you can post match an old line to an old invoice, assuming the invoice shows up in the drop down.
4.6 - Purchasing Order Processing
Purchase Order Processing allows for the management of supplier purchase orders for both goods and services.
Before any orders can be processed suppliers must be set up on the system. This is achieved by first entering an account via Contacts > Accounts. The Account must be flagged as a supplier in the category section.
Once the contact details are added the supplier must be initialised in the Purchase Ledger under Accounts > Purchase Ledger > View Suppliers > Add Supplier. Here details relating to payment, VAT status, etc can be updated.
Products
Menu:
Logistics > Purchase Orders > Products
Logistics > Purchase Orders > Product Lines
The Product and Product Lines options are used to define the product catalogue for purchasing. In a manufacturing or wholesale environment, most product lines will be linked back to a stock item as well as to a defined supplier.
Using products is optional, order lines can still be entered on-the-fly by just entering a price and description. This enables one-off items to be purchased without the overhead of defining a product. For regularly purchased items the use of products is highly recommended. For stock controlled items the use of products is mandatory
Each product holds the following information:
Product Group - use this drop down to pre-select the product group of the item where the item is stocked
Stock Item - if the item is stocked, relate this price to a stock item
Description - a description for the item - this is defaulted to the item description where the product is a stock line
UoM - the unit of measure
Tax Rate - whether the item is taxable and the rate of tax to charge
GL Account - the GL account where the purchase is to be credited
Cost Centre - the cost centre where the purchase is to be credited
Start Date - the effective date of the price for this product
End Date - this can be used to ‘close off’ products so that they are no longer valid and cannot be used
Product Lines
Once a product is added individual price combinations can be added for suppliers and dates. Each product can have multiple lines to denote different suppliers for the same item. In addition the system can be used for time based pricing where a supplier increases (or decreases) prices over time.
Each product line holds the following information:
Supplier - the supplier for this price, leave blank to have this price available from ALL suppliers
Supplier Product Code - if required, enter the supplier’s code here for those situations where the supplier’s code needs to be quoted on documentation
Description - a description for the item, defaulted to the item description where the product is a stock line
Currency - the currency for the price (based on the customer’s currency)
Price - calculated based on gross price and discount matrix for the customer/type/discount combination
GL Account - the GL account where the purchase is to be credited
Cost Centre - the cost centre where the purchase is to be credited
Start Date - the effective date of the price for this product
End Date - this can be used to ‘close off’ product lines so that they are no longer valid and cannot be used
EAN - can be used to implement bar coding
When viewing Products or Product Lines, the default search selects records that are current at today’s date. Anything that has an end date in the past or start date in the future will not be listed.You can clear the Current At date search to show all past, present and future products/lines or set Current At to an appropriate date.
Order Processing
Orders are entered by selecting the Purchase Orders > New Order menu option or by using the New Purchase Order link from the sidebar of the purchase orders list view.
If the total value of the order exceeds the user’s authorisation limit, it will become a requisition and require authorisation before it can be sent to the supplier
The basic purchase order processing steps are:
Enter the purchase order
Send the order to the supplier by using the sidebar Print Order action. The order can be printed or sent via email, etc.
Optionally indicate that the order has been acknowledged by using the Order Acknowledgement Received action.
[[Create and match supplier invoices|Modules/Logistics/Purchasing/Invoicing]]
Order Status
Each order/order line can have one of the following statuses:
New - order has been entered but not sent to the supplier
Awaiting Delivery - ordered but no deliveries received
Part Received - partial delivery received
Cancelled - order/line cancelled
Received - total order quantity received
Invoiced - order/line matched to an invoice
4.7 - Sales Invoice Resgister
The Sales Invoice Register is analagous to a sales “day book” and records every invoice or credit note entered. Invoices can be entered directly into the Sales Invoicing system or can be generated from the uzERP [Sales Order Processing](Sales Order Processing) system.
4.8 - Sales Order Processing
Please see the [[Sales Order Processing How To|How-To/Sales-Orders]] for some answers to common questions.
[[TOC]]
Product Lines
Sales Order Product Lines represent the organisation’s catalogue.
You can input products for sale based on price lists which may be general across the company or relate to customer groups. In addition individual product prices may be input for specific customers. The columns in the SO product lines table are:
Product Group - use this drop down to pre-select the product group of the item where the item is stocked
Customer - the customer for this price, leave blank to have this price available to all customers
Stock Item - if the item is stocked, relate this price to a stock item
Customer Product Code - if required, enter the customers code here for those situations where the customer’s code needs to be quoted on documentation
Description * - a description for the item - this is defaulted to the item description where the product is a stock line
So Price Type - if this product line relates to a price list, for example trade or retail
Gross Price - the gross price
Product Group Discount - where extra discounts are available by group the code can be added here
Net Price - calculated based on gross price and discount matrix for the customer/type/discount combination
Currency * - the currency for the price (based on the customer’s currency)
UoM * - the unit of measure
Tax Rate * - whether the item is taxable and the rate of tax to charge
GL Account * - the GL account where the sale is to be credited
Cost Centre * - the cost centre where the sale is to be credited
Start Date * - the effective date of the price for this product
End Date - this can be used to ‘close off’ product lines so that they are no longer valid and cannot be used
Items marked * are mandatory.
When viewing Products or Product Lines, the default search selects records that are current at today’s date. Anything that has an end date in the past or start date in the future will not be listed.You can clear the Current At date search to show all past, present and future products/lines or set Current At to an appropriate date.
During order entry the system will look at this table to determine the items available for sale for the customer in question and build an appropriate drop down list allowed for that customer based on products that are:
in the appropriate ‘price type’ for the customer (the ‘price type’ for the customer is set against the Sales Ledger record).
specific to the customer, that is where the product line is allocated to a customer
available in general to all customers
Entering products and prices here therefore greatly speeds up order entry. It is also worth noting the following when entering orders where the SO product line is used:
When linking an item to a Sales Order Product Line, the item code and description from the Stock Item is copied to the Sales Order Product Line description which can then be amended to add additional information to the Sales Order Product Line (for instance customer part numbers/description)
There are two description fields on the Sales Order Line; item description and description
The description is always displayed on the Sales Order Line; in some places, the item description is also displayed
The Sales Order Line description comes from the Sales Order Product Line description; the Sales Order Line description can then be changed to provide additional information at order entry time
The Sales Order Line description is copied to the Sales Invoice Line
The Sales Order Line item description comes from the Stock Item description to match with the linked stock item; the Sales Order Line item description cannot be changed
The Sales Pick List shows the Stock Item code and the description from the Sales Order Line; this will highlight any differences between the linked stock item and the description
When editing a Sales Order Line, the description is not automatically changed because this could lose any additional information that was originally entered for that order line
If the Stock Item description is subsequently amended, neither the Product Line description nor the Sales Order Line item description is automatically updated
Order Processing
Orders are entered by selection the add Sales Orders -> New Order menu option or using the New Sales Order link from the sidebar of the sales orders list view.
Order Status
Each order/order line can have one of the following status. These are pretty straight forward and are listed below.
New - the order has been entered
Open -
Cancelled
Despatched
Part Despatched
Invoiced
Sidebar Actions
Print Acknowledgement
Prints an acnowledgement for the order and sets its status to Open
Print Pro Forma Invoice
Allows for the printing of a proforma invoice.
Print Pick List
Confirm Pick List
Confirm items as picked on a line by line basis.
Edit Sales Order
This option only appears if editing is allowed, based on the status of the order.
Revise Line Despatch Date
Each line can have a different despatch date - this option allows for revisions for new/open lines.
Cancel Lines
Cancel lines on an order.
Related Items
Show Packing Slips
This option is used to create a packing slip that can be enclosed when goods are despatched.
Price Types
Price types allow SO product lines to be grouped into price lists. Customers can be allocated a Price Type which means that at Order Entry the system will look for prices from the SO Product Lines table which are allocated to this price type. Examples would be:
EU - European Distributors
Medical - Medical Distributors
Trade - Trade & Industrial Customers
In addition Customer Discounts can be used to apply a discount to a price type based on an item’s product group for a particular customer.
Item Availability
When processing customer orders it is useful to have an overview of the availability of stock within the system. Two screens are available:
This shows demand for [[Stock Items|Modules/Manufacturing/Stock]], i.e. sales orders vs stock and supply ([[Works Orders|Modules/Manufacturing/Works-Orders]] or [[Purchase Orders|Modules/Logistics/Purchasing/Purchase-Order-Processing]]).
The columns are:
Required = quantities from sales order lines
Available = available quantities in saleable locations
In Stock = quantities in stock but NOT in saleable locations
Actual shortfall = (Available + In Stock) - Required
On Order = Quantities from Purchase order or Works order lines
Expected Shortfall = Actual Shortfall - On Order
Note that this ONLY deals with stock items, if the item is not stock on then it won’t appear. Item Availability only shows items for which you have an order whereas the View Supply/Demand shows the full list and can be selected by Product Group).
5 - Manufacturing
The Manufacturing module is used where you wish to store or make items for sale or distribution.
5.1 - Warehousing and Stores
The uzERP warehousing module helps keep track of stock (inventory) by controlling where things are located.
The warehouse management system is where the set up of Stores (warehouses), locations and bins takes place. The system uses a series of one to many relationships to represent a hierarchical structure - thus a Store can have many Locations, and a Location can have many (optional) Bins.
In addition the system uses a “double entry” method to track stock - such that any movement affects two locations. For instance receipts of goods come “from” a purchase location into a stock location. For this reason some locations can be treated as “No Balance” locations.
Warning
The system requires at least 1 warehouse and 2 location codes to function. If this approach is not taken, little meaningful information will be available and several of the manufacturing functions may not work properly.
What You Can Do With uzERP Warehouse Management
Maintain Location Balances - displays and reports show all balances held in real locations (as opposed to no-balance locations) and can aggregate them.
Evaluate Stock Balances - balances may be evaluated using item costing data. This allows you to answer questions like, “What is the value of finished goods stock?” or, “How much do we have tied up in inspection?”.
Maintain Stock Transaction History - every stock transaction is recorded, with its date and time, together with the cost prevailing at the time. This table can be used for a wide variety of historical and audit tasks, as well as extracting inventory movement data for transfer to the accounting system if required.
Evaluate Stock Transactions - the transaction history table can be evaluated, using the current cost or the cost when the transaction was made. This allows you to answer questions like, “What is the value of WIP issues to date this month?” or, “What is the cost of sales deliveries this week?” These stock transactions and the related cost data can be used to maintain the financial state of your stock.
Restrict Stock Available For Sale - balance locations may be marked as “Goods-for-sale” locations. uzERP’s Sales Order processing routines will only sell stocks in these accounts.
Provide An On-Line Bin Card - The transaction history display for each item in the system uses a format similar to a bin card, including historical balances and running totals. This can make uzERP appear reasonably familiar to stores personnel used to manual systems.
5.2 - Stock
The stock (inventory) module can be used to track all aspects of your organisation’s stock
Please see the Stock How To for some answers to common questions.
In some senses the Stock system is the heart of the commercial system if you are a manufacturer or wholesaler as every aspect of the business will be related back to a stock item is some way. The stock system will hold:
Stock Item details
Units of measure
Structures and Operations for manufactured, sub-contracted and kit items
We suggest that a stock map be developed prior to implementation of the system. This will assist in defining the relationships between stores and locations and producing a view of how stock moves between them.
Stock Accuracy
Stock accuracy is of prime importance in running any business that buys, sells or makes products. If your stock records are wrong, then anyone using those stock records for information to support decisions will:
Make wrong decisions (if the records aren’t known to be wrong)
Not trust the records and use judgement, not fact
The results of inaccurate stock records are felt in a number of ways:
Excess stock that needs funding (more than you realise!);
Shortages that lose business;
Increased overheads as everybody keeps their own stock records;
Confusion when stock records disagree (more costs).
No business will maintain a competitive edge with inaccurate stock records. Your target stock accuracy should be 100% in all areas. You should be getting near to this, in the high 90’s, to be confident.
Stock Items
Stock Items are the core of the stock module. The basic information for a stock item is as follows:
Item Code * - a unique identifier for the stock item
Alpha Code - a free format code used for analysis
Uom * - the unit of measure for the item as defined in the UOMs table
Prod Group * - a product group used for analysis
Cost Decimals * - the number decimal places to hold costs
Qty Decimals - if you require whole items set this to 0
Min Qty/Max Qty - used for replenishment reports
Tax Rate * - when purchased or sold the tax rate normally used for this item
Description - a description
Type Code * - the type code drives certain actions i te manufacturing and stock system such as backflushing and can be used for analysis
Comp Class * - component class is one of Bought in, Manufactured or Sub-Contracted
Abc Class * - inventory management classification
Materials Cost * - if Comp Class is Bought-in this can be entered here
Obsolete Date - if this item is marked as obsolete
Items marked * are mandatory.
Cloning Stock Items
Items can be cloned(copied) using the Clone Item action, available on the sidebar when viewing and item. Optionally, other records attached to the item can be copied at the same time.
When cloning the Sales Order Product and prices there a a few things to note:
only prices that are not specific to a customer are copied
descriptions on the sales product and prices will match the item being cloned
the specified start date will be applied to the sales product and price
Stock Transactions
Each movement will generate two transactions (based on double entry) – a “from” and a “to” in line with the warehousing system. Backflusing in the manufacturing system will move stock and generate transactions.
Product Structures
A product structure (BOM) is a list of the components that build a
finished item. If each of the components in a structure has a price then the
system will automatically build up the cost of those components to make 1 of
the finished items. You can build in waste and also cost the labour and
machine time to give you a full cost. The system will also maintain it so that
every time the price of a part changes (say the cost of rims increases)
it will automatically update the cost of all the finished items where the
part is used so you always have the latest cost on file for all of the items.
5.3 - How to create a stock map
Learn how to make a stock map to help you configure uzERP stock movements
When setting up the warehouse management system it is particularly important to create a stock map showing Warehouses and Locations, the Actions that generate the stock movements and how these are to be handled and the movement types between the locations associated with each action.
The terminology used in uzERP is as follows:
Term
Description
Store
A physical warehouse or manufacturing facility
Location
Physical OR logical stock location. There can be many locations within a store and they can be designated as balance or ’no-balance’ locations
Bin
Sub-divides a Location if required for finer grained physical control
Action
Defines an action that is taken that results in a stock movement from one store/location/bin to another - each action must have at least one transfer rule
Transfer rules
Define the permitted movements between stores/locations - each transfer rule is associated with an action
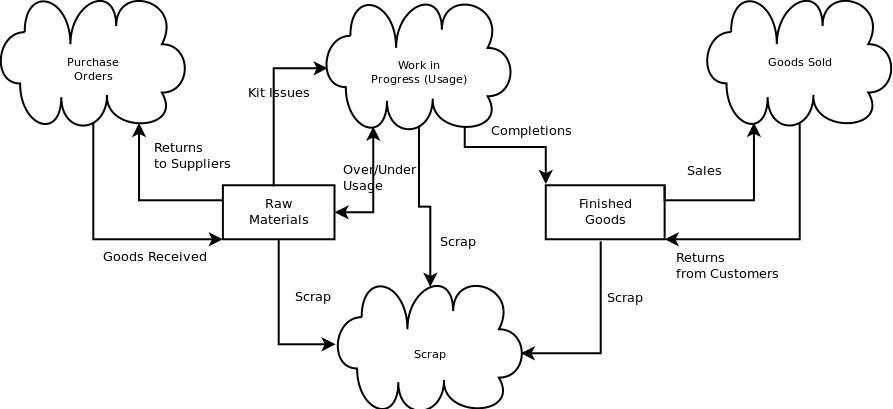
Example Stock Map
uzERP’s stock movement system is a ‘double-entry’ system - each and every stock movements is represented by a pair of transactions - there must be a “From” and a “To” component. This means that there has to be some way to represent locations that are ‘outside’ of the physical stock system. This is what ’no-balance’ locations are for.
The boxes in the diagram represent Stock Locations that are designated as ‘balance locations’ i.e. they hold real stock. These may be physical locations for example ‘Raw Material stores’, or logical locations, say ‘Goods awaiting inspection’. For these, a stock balance is meaningful and is held by the system in the balances table. The ‘clouds’ are no-balance locations, which don’t have balances held, but represent logical locations where stock is moved to or from.
The individual warehouse Transfer Rules are represented by arrows between the locations and the Actions these rules are associated with are shown by the labels. You will notice that some Actions are associated with only one Transfer Rule, while others connected to several. For example, goods are received from a no-balance location called Purchase Orders into a balance location for Raw Materials.
Once the stock map is completed you can then go through the process of adding the locations and actions to the system via the Setup -> Manufacturing Setup -> Stock Actions routines.
5.4 - Works Orders
Manage production Work Orders
Works orders are used to drive the manufacturing process and are crucial to the demand planning and shop floor data capture parts of the system. Works order information can be accessed from the Manufacturing -> Works Orders menu option. The Manufacturing module home page has the following uzLETs for managing works orders
Print Works Orders
Book Production and Issues/Returns
Backflush Errors
The stages of a Works Order
Orders go through several stages denoted by the status indicator:
New - The order has been entered onto the system but is not yet finalised. At this stage no bookings can be made to the order but it shows up in all of the demand and requirement reports.
Released - The order is available for document printing and will appear in the open order uzLETs.. Materials can be reserved against orders with a released status and but work has not yet started as no production has been booked.
Open - Production has been booked to the order or materials issued or reserved. The order is ‘in progress’.
Complete - The order is completed.
Adding a Works Order
The menu option Manufacturing -> Works Orders -> Add Works Order takes you straight to the form and following information is required to add a works order:
Stock Item - all manufactured items are shown in the drop down.
UoM - the unit of measure for this works order. This will default to the usual unit for the item although alternative UoMs may be used where ther is a conversion factor in place.
Data Sheet - If a data sheet is to be issued with the works order.
Order Qty - how many units are required.
Required By - when the works order is due to be completed.
Project - if the works order is related to a project it may be selected here.
Text1, Text2, Text3 - free format text.
Order No, Order Line - a sales order or customer order and the line to which this order relates.
Documentation - any documentation required.
A works order is added with a status ‘New’.
Managing a Works Order
There are various actions for managing Works Orders that have been entered. When the works order is selected from the collection
the following sidebar actions are available
Edit
Review Material
Review Resources
Force Complete
Issues
Returns
Book Production
Reset Status
In addition there is a ‘show related’ option to view all transactions against the order.
Booking Production
Production against a works order is booked by using the Book Production uzLET.
Shop Floor Loading
5.5 - Backflushing
Automating material consumption in manufacturing
Backflush refers to a special type of stock transaction. When backflushing is in use, uzERP can be made to assume that raw materials or components have been used because a particular action in the stock system has taken place. This assumption is based on the product structure for the item being produced.
The reasons for wanting to use backflushing vary. In process-flow or JIT production environments it is often the most cost-effective way to provide records of raw material or component consumption. This way material costs can be attributed to products made on a particular works order. Installations like this usually have excellent procedures and quality control and can rely upon actual events following plans.
Within uzERP backflushing can also be used as a way of tracking consumption or free-issued materials at sub-contractors by moving the assumed consumption on receipt of the goods.
Beware of backflushing simply to save stores time, or if there are not enough stores personnel to perform all the necessary transactions. A system like uzERP will only perform if events in the system actually line up with events on the ground and backflushing will magnify this issue - when the system is asked to make assumptions like this it is doubly important that data is accurate and the assumptions are valid.
Batched, serialised or bin controlled components cannot be backflushed because uzERP cannot tell which batch was issued, or which bin stock was taken from.
Set Up for Backflushing
In order for backflushing to work there must be a backflush action set up that details the movement required for the raw materials or components on completion of the stock item being produced - whether or not backflushing is used is determined by the type code of the item being produced or received.
This means that a type code must be set up where there are different actions, perhaps where there are both manufactured and sub-contracted parts.
Backflush Errors
In the event of an error, when uzERP can’t find enough stock to make a backflush issue, an ‘unresolved’ movement is created. There is a uzLET on the default manufacturing sceen which shows that there is a problem, which is shown below:
{{:backflusherrors.png|750}}
Clicking on the link will take you to the transaction where the problem can be resolved.
{{:backflushresolve.png|}}
A regular audit of backflushes should be carried out by using the stock transaction view and searcing for unresolved stock transactions.
5.6 - Production Recording
Collect performance data related to shop floor operations
This part of the manufacturing module allows you to collect performance data related to shop floor operations. You are able to set up
The quality module allows users to input and track complaints by retailer, status, complaint type, product etc.
Adding / Editing a Complaint
The only required field for a complaint is the date of which it is raised, which can be any time in the past, present or future. However entering an as concise complaint will increase it’s value to you as data.
Fields
Field Name
Required
Search
Comments
Complaint ID
✔
✔
Generated by system, prefixed with complaint type (SD / RR)
Date
✔
✔
Order number
Customer
Retailer
✔
Product
✔
Product complaint
Complaint code
✔
Supplementary complaint code
Currency
Credit amount
Credit note number
Invoice / debit number
Date complate
Assigned to
✔
Problem
✔
Investigation
Action
Complaint Behaviour
When entering a complaint, certain fields values can affect the behaviour of other fields, and thus, general functionality. You should be aware of the following:
Entering a completed date will remove the assigned to person
The assigned to field is great for being able to track a complaint as it circulates your organisation, however when a complaint has been closed a completed date should be entered. When a complaint is completed it is no longer one person’s responsibility, therefore any value within the assigned to field is removed.